Documentation of BanghamLab utilities: Difference between revisions
Jump to navigation
Jump to search
No edit summary |
No edit summary |
||
| Line 13: | Line 13: | ||
|- valign="top" | |- valign="top" | ||
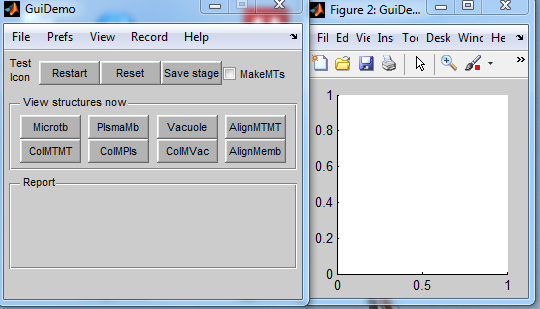
|width="200"|Working template created by GuiDemo. <br><br> | |width="200"|Working template created by GuiDemo. <br><br> | ||
It has names (GuiDemo), menus, buttons and a graphics window. All of which can readily be changed or deleted. | It has names (GuiDemo), menus, buttons and a graphics window. All of which can readily be changed or deleted.<br> | ||
Closing either window closes both.<br> | |||
Having selected a menu item or pressed a button, the callback is displayed in the command window. This makes it easier to edit/add the required functions. | |||
|width="150pt"|[[Image:ConnectedSetsGUI1.png|Heartdrawing]] | |width="150pt"|[[Image:ConnectedSetsGUI1.png|Heartdrawing]] | ||
|} | |} | ||
| Line 31: | Line 33: | ||
} | } | ||
[[GuiDemo Template|Full listing of template]]<br><br> | [[GuiDemo Template|Full listing of template]]<br><br> | ||
Once again replace all strings ''GuiDemo'' by ''ConnectedSets'' within ''ConnectedSetsLayout.txt''. | |||
<li>Notice all the buttons and menu items are specifed in ''ConnectedSetsLayout.txt''. The layout is automatically created from the structure of ''ConnectedSetsLayout.txt''. Callback names etc. tags etc. are created automatically.</li> | |||
</ol> | </ol> | ||
Revision as of 13:40, 30 March 2013
In preparation
GuiDemo for rapidly creating user interfaces from simple dialogues to full applications
Whilst the Matlab guide is very useful for rapidly creating graphical user interfaces (GUIs) with an arbitrary layout, we find that it is even quicker to base a GUI on GuiDemo.
Why? Because we find it easier to delete things we don't want, and modify those that we do want, rather than starting with a blank screen.
Creating a GUI based on GuiDemo
Description of how the ConnectedSets Gui was created.
- Copy the contents of \DArT_Toolshed\ToolBag\Demo of JRK GUI to your working directory.
- Rename, e.g. GuiDemo.m to ConnectedSets.m and GuiDemoLayout.txt to ConnectedSetsLayout.txt
- Within ConnectedSets.m replace all strings GuiDemo by ConnectedSets. We now have a working template.
- Text and the left hand, GUI, panel is specified by the text file ConnectedSetsLayout.txt. A small fragment is shown here figure { string "GuiDemo" tag figure_GuiDemo callback GuiDemo inherit callback menu { string "File" size "0 0" menu { string "New Project" } menu { string "Open Project..." } menu { string "Save Project As..." } menu { string "Close Project" } menu { string "Show Project On Desktop" } } Full listing of template
- Notice all the buttons and menu items are specifed in ConnectedSetsLayout.txt. The layout is automatically created from the structure of ConnectedSetsLayout.txt. Callback names etc. tags etc. are created automatically.
Once again replace all strings GuiDemo by ConnectedSets within ConnectedSetsLayout.txt.
